
How to Polish Concrete – An Easy Guide from Our Experts
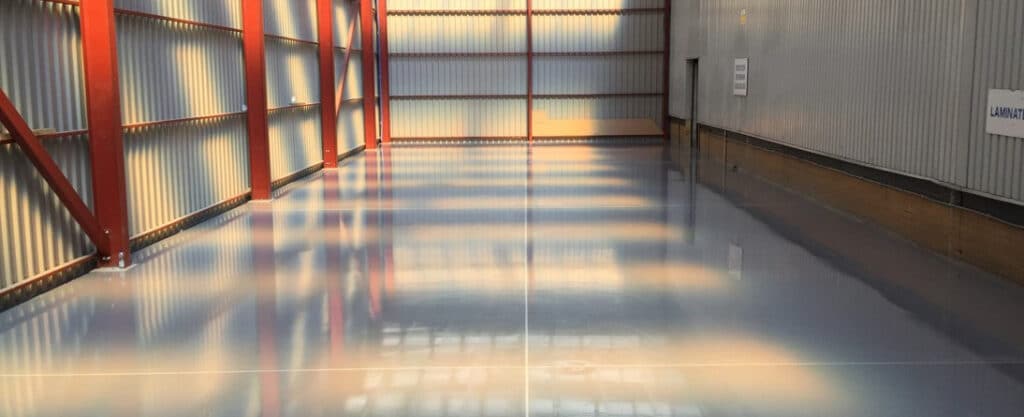
Looking to upgrade your concrete garage floor, warehouse floor, or even a large residential space? A polished concrete floor could be your solution. You can transform your old flooring and make it look like a freshly laid new concrete floor, or get a brand-new floor for a brand-new space. Concrete patios, basement floors, and garage floors can all benefit from a sleek and modern style in any property.
Polishing concrete can also increase the durability of the base material
Here at Concrete Flooring Solutions UK, we can give you a step-by-step guide on how to polish concrete floors. But beware, you must be ready to undertake the mammoth task of creating a polished floor, as it does require a lot of physical labour and time.
If you would prefer to leave the hard work to the professionals, feel free to contact our team of experts at Concrete Flooring Solutions. Simply call us today, or send us a message through our contact form, to see how we can give you the UK’s best service when it comes to polished concrete flooring.
So, if you’re wondering how to clean polished concrete, and how long it takes, and you’re prepared to complete the polishing process by yourself, here’s a thorough guide on how to polish your old concrete floors, or new concrete floors, by hand.
Cleaning and Patching the Surface
Before you begin to polish concrete floors by hand, you’ll need to clean the entire surface with soapy warm water and a bristle brush, or bristle broom brush, to remove any stains from the concrete so that they are not immortalised underneath the polish. For stubborn stains, a pH-neutral solution may not be enough. You may need to pop some protective eyewear on your face, ensure the room is well ventilated, and use either hydrogen peroxide, ammonia, or trisodium phosphate to clean your floor.
Examine Floors for any Damage or Hazard Spots
After you clean the surface, you should be able to see any imperfections more clearly. Make sure to scan the surface for any cracks or potential hazards before grinding the floor. Cracks can be filled by hand with concrete crack filler, and protruding pieces of metal must be chipped out. When using concrete filler to repair any holes, let the product cure fully as per the time listed in the package instructions. After the filler or patch has cured, sweep up any debris on the floors in the repair area. If you are not confident in doing this yourself, hire a professional through our contact form.
Test the Hardness of the Concrete with MOHS Picks Before Grinding
If you don’t happen to have a set of Measurement of Hardness Scale (MOHS) picks lying around your workspace, you will need to purchase some online. With the picks, hold it like a pencil and apply the same pressure as writing to scratch the concrete in a small line until you reach a pick which does not leave a scratch. Start with the highest number and work your way down the set.
For example, if pick number 7 leaves a scratch but pick number 6 does not, the concrete has a MOHS hardness of 6.5. The concrete hardness, soft (5.5 or lower), medium (6.5), or hard (7.5 or higher), will determine the set of grinding discs that you should rent or purchase.
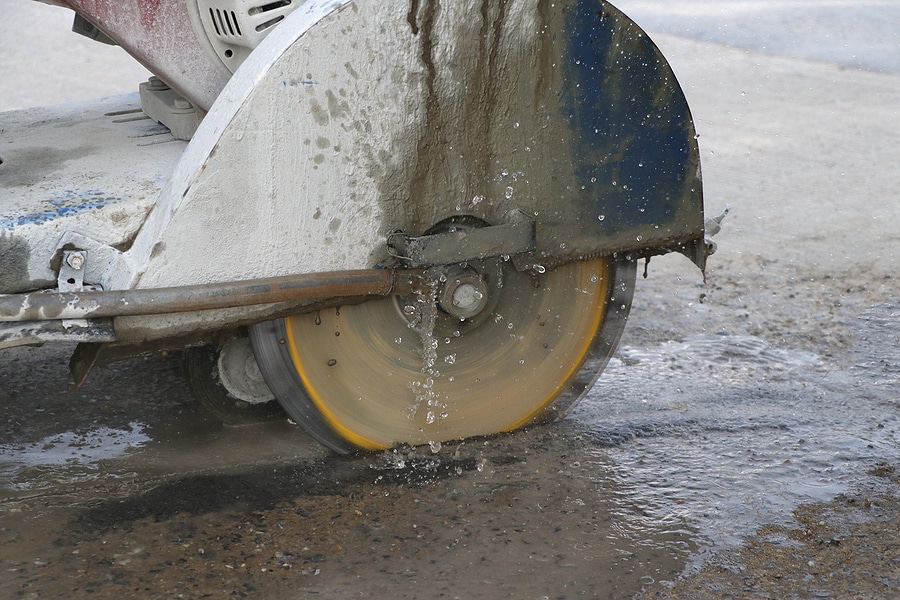
Rent, or Purchase, a Concrete Grinder with Metal-Bonded Diamond Discs
You must use a specialised tool to grind concrete; a standard sander won’t do the job. When renting a grinder at a hardware store or tool rental retailer, choose a set of grinding discs that specifically suit the hardness of concrete based on your MOHS reading to ensure you’re exposing aggregates. The grinding discs must be metal-bonded diamond disc pads. Non-diamond pads aren’t hard enough to grind down the concrete properly. Renting a grinder can also be very costly, depending on the size of the project, so it may be more cost-effective to hire a professional to do the job for you.
If you’d like to save your money and get the job done by people who really know what they’re doing, hire a professional through our contact form.
Using the Grinder
Prior to using your new rented or purchased concrete grinder, make sure you are wearing the appropriate safety equipment. A dust mask, thick gloves, safety goggles, non-slip footwear, a safety helmet, and earplugs. The grinder is loud, creates a lot of dust, and can cause serious injury if used incorrectly.
During grinding, attach the disc according to the grinder’s instructions. To remove any stains, sealer, or other contaminants that were not removed in step one, start with a 40-grit grinding disc. If the floor is fine as is, start with an 80-grit grinding disc. Turn the grinder on and use the handle to turn the disc in a half-circle motion, slowly moving forward and working over the surface evenly.
Start from the wall of one of your corners of the surface and work your way out and over to the wall of the opposite corner, and repeat this process with grinding discs 80- to 400-grit. Pass over the entire surface with each new disc, 40-grit, 80-grit, 150-grit, 200-grit, and 400-grit, working at an adjacent corner to where you started the previous pass.
Depending on the hardness of the concrete, as per the results of the MOHS test you conducted, apply a spray-on densifier – a liquid chemical hardener. This must be applied over the entire surface, making it less permeable and less likely to form powdery dust on its surface. For soft concrete, apply the densifier after using the 80-grit disc. For medium concrete, use it after the 200-grit pass. For hard concrete, wait until after the 400-grit pass.
Make the final grinding pass with the 3000-grit grinding disc; finer grits will bring you a smoother surface, with the same motion as before, to begin the process of polishing the surface. After grinding, make sure to complete a dust mopping or vacuum all dust and debris off the concrete surface with a wet-dry vacuum.
Polish and Seal the Surface
Before applying the sealant, make sure you’re applying during dry conditions, and make sure that the air temperature remains above 10 degrees Celsius during the application and for 24 hours after completion.
Following the product instructions, attach the polishing pad to the grinder. Using the same technique as before, go over the freshly ground concrete in order to buff and smooth the concrete with the burnishing setting, or a low variable speed setting.
Make sure to choose a water-based or solvent-based concrete sealer and follow the application instructions. If it needs to be rolled on, use a paint roller and paint pan to apply a thin coat on the concrete surface. If it needs to be sprayed, fill a sprayer and apply a light and even coating on the surface.
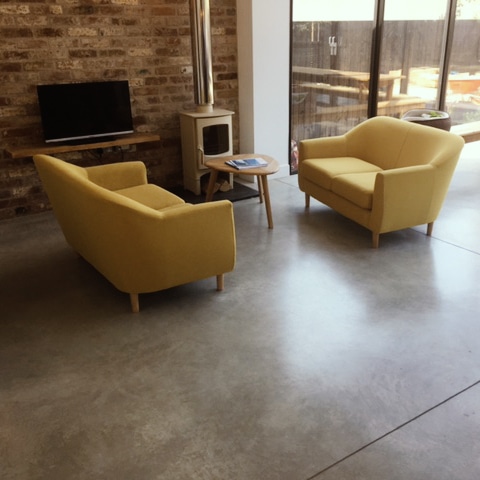
Sealers protect the concrete against grease, dirt, and other stains. Moreover, using a glossy sealer should give the polished concrete a sheen effect.
Apply a second coating of sealant after the first coating is dry. It should only take between two and four hours for the first coating to dry; if it is still sticky to the touch, let it dry for another two hours.
Once the sealant is completely dry, pass over the surface with the burnishing pad or buffer to enhance the smooth, glossy finish. After this final burnishing, wait one to three days before using the finished surface in order to allow the surface to completely dry. Once it’s dry, it is ready for active use.
Contact the Professionals
If all this seems like too big a task to undertake by yourself, we won’t judge you. Our team of expert concrete floor polishers will be more than happy to complete this job and move your project forward.
Simply call us today, or send us a message through our contact form, to see how we can give you the best service when it comes to polished concrete flooring.